Contact me for feedback or questions! I reply to everyone.
Privacy support is one of the chief criteria upon which users pick (or should, anyway) a web browser. Often, a person's opinion of a browser's privacy is manufactured by assumptions, marketing talk, or its privacy policy (which can be hard to read and understand, omit information or outright lie). Wouldn't it be great if we had a way to prove whether a browser actually cares about your privacy, or just bullshits its way through? Fortunately, there is a powerful tool to see exactly what a browser does behind your back, and I'm going to present it to you right now. Let's lift the veils!
First of all, install mitmproxy. You can do it easily by typing this command on the terminal: pip3 install mitmproxy (you will have to install python3 first - should be available in most Linux repositories). What is mitmproxy? Simply, it is a local proxy server to which you can point your browser, which will allow you to see the connections it makes (it has many more features, but in this article, that's our only focus).
First, run mitmproxy by typing the terminal command mitmproxy -p 3128. The 3128 is the port on which the proxy will run on. Now go to your browser's proxy settings, and put in 127.0.0.1 for the IP, and 3128 for the port (make sure to fill both the HTTP and HTTPS fields). Chrome based browsers have it slightly harder, since they don't support GUI proxy settings. You have to run them from the command line like this: name of browser --proxy-server="127.0.0.1:3128". Replace "name of browser" with the executable name, for example iridium-browser --proxy-server="127.0.0.1:3128".
You will need to run it through proxychains with this config file put into
/etc/proxychains.conf. Then, type proxychains4 name-of-browser
into terminal. If it worked, the proxychains output should be something like this (this is for the suckless Surf
browser):
proxychains4 surf digdeeper.neocities.org
[proxychains] config file found: /etc/proxychains.conf
[proxychains] preloading /usr/lib64/libproxychains4.so
[proxychains] DLL init: proxychains-ng 4.14
[proxychains] DLL init: proxychains-ng 4.14
[proxychains] DLL init: proxychains-ng 4.14
[proxychains] Dynamic chain ... 127.0.0.1:3128 ... digdeeper.neocities.org:80 ... OK
[proxychains] Dynamic chain ... 127.0.0.1:3128 ... digdeeper.neocities.org:443 ... OK
[proxychains] Dynamic chain ... 127.0.0.1:3128 ... digdeeper.neocities.org:443 ... OK
[proxychains] Dynamic chain ... 127.0.0.1:3128 ... digdeeper.neocities.org:443 ... OK
[proxychains] Dynamic chain ... 127.0.0.1:3128 ... digdeeper.neocities.org:443 ... OK
[proxychains] Dynamic chain ... 127.0.0.1:3128 ... digdeeper.neocities.org:443 ... OK
[proxychains] Dynamic chain ... 127.0.0.1:3128 ... digdeeper.neocities.org:443 ... OK
And of course, you should see all the requests in the mitmproxy terminal window.
Now, if your browser is of the spyware kind, you should already see some requests in your terminal window - but wait, setting up mitmproxy isn't over yet. By default, it only shows pure HTTP
requests, since browsers won't allow it to decrypt SSL. Fortunately it has an easy way to add a root certificate to your browser, which will allow just that (the "mitm" part in mitmproxy refers
to that). Switch to your browser window and type mitm.it in the address bar. Now choose your platform and follow further instructions. If you succeeded, you should be able to
go to any HTTPS website and see the request in mitmproxy (which will start with GET https://). Note: the Chrome instructions are needlessly complicated and appear
not to even work. All you need to do is enter Settings, search for "cert" at the top, click Manage certificates
, then import the mitmproxy-ca-cert.pem file (Authorities
tab). Some browsers (such as the aforementioned Surf) automatically trust all certificates, so you don't need to do anything to get the SSL working with mitmproxy. Okay, we've
got SSL decryption enabled - what now?
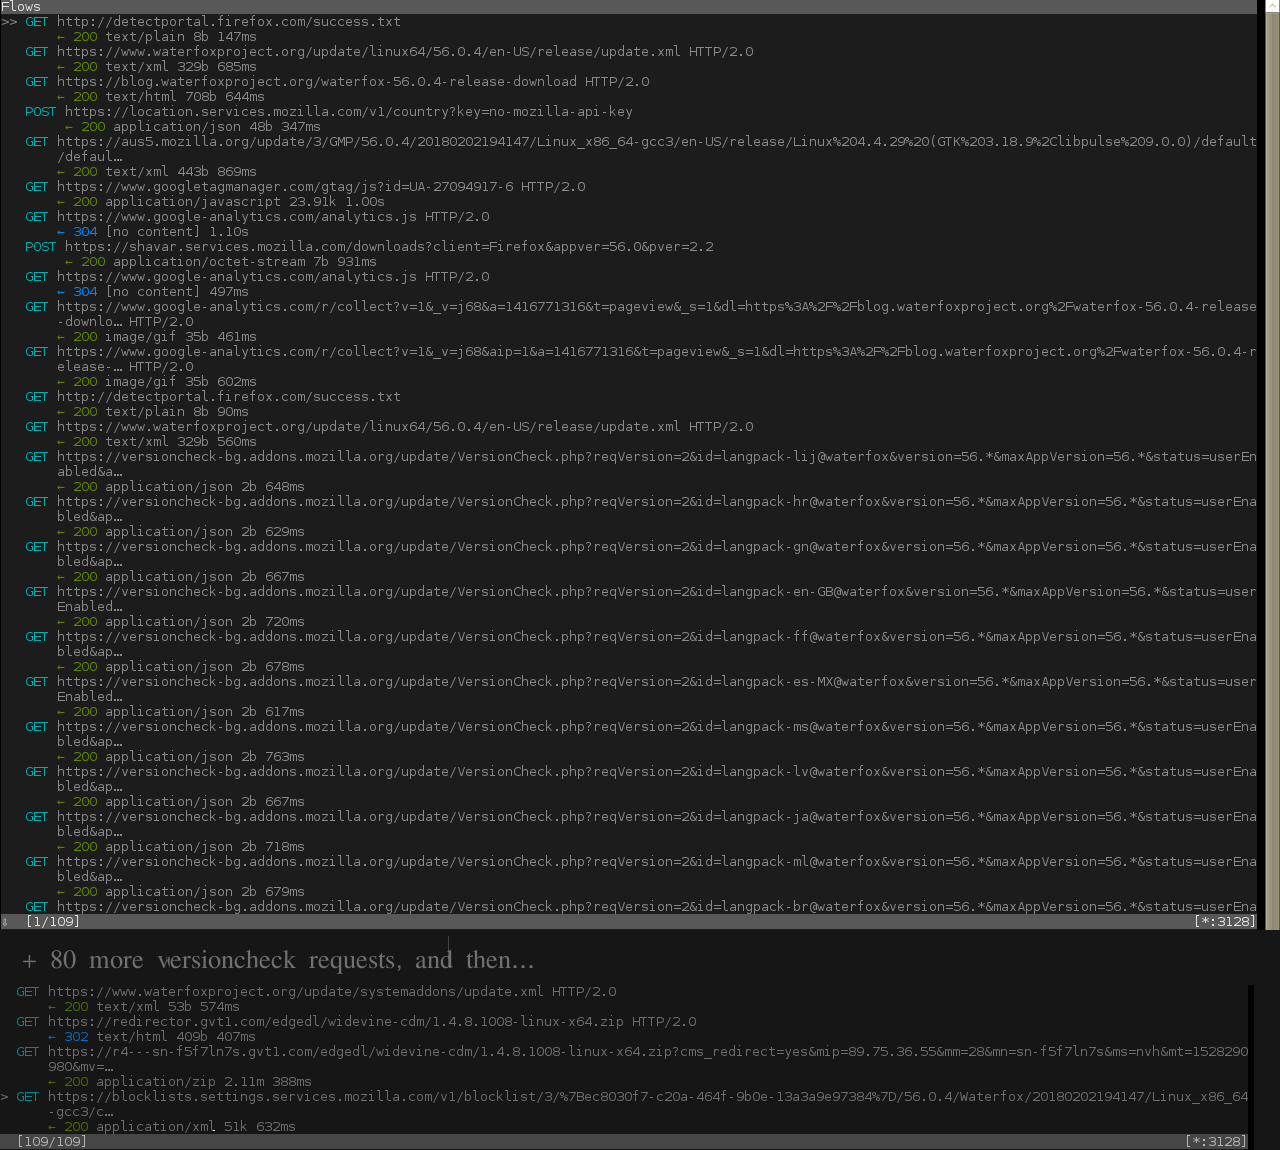
Just wait! Yes that's it. The whole point is to wait and see what requests the browser makes without your input. You can scroll through requests with the arrow keys and inspect them in detail by pressing Enter. This will show ALL the data that the browser is sending, as well as receiving. Of course, understanding it takes a lot of experience, but at least you now have the opportunity to Lift The Veil, if you want to! You might be surprised to see that common web browsers make hundreds of requests without your knowledge, even ones that are generally considered "respectful of your privacy". For example, Waterfox scores at exactly 109 unsolicited requests, just by turning it on! And it's advertised as privacy-based - but thanks to mitmproxy, you can lift the veil, and expose the claim for the lie it is. Isn't that empowering? No more relying on popular opinion, deceptive advertising, or shitty privacy policies (which should be called spy policies). Now it's all there for you to check.
Of course, you won't see all the spyware by just waiting. Some of it can hide in places such as the new tab pages or require visiting a website (Opera's collection of browsing history for example). Also, many requests are only made the first time you run a browser, where it's not going through mitmproxy yet, which will prevent you from seeing them. How to bypass this?
Close your browser. Now go to the browser's config directory (for example /home/hackerman/.config/vivaldi/) and remove the "First Run" file. That should do it. Use the Z key in mitmproxy to delete all previous requests, so that it is easier to see only the new ones. Run the browser again.
A little tougher. You also have to go to the browsers config directory, which will not be .config but .mozilla (for FF and IceCat), .waterfox (for Waterfox), or .moonchild productions (for Pale Moon). Now CLOSE YOUR BROWSER (if you have it open), find the file prefs.js, and in it, the line user_pref("network.proxy.http", "127.0.0.1");. Now copy everything starting from that until user_pref("network.proxy.type", 1);. Delete everything else in the file and save. Your prefs.js should look like this (now probably not everything has to be necessarily deleted, but let's be safe...). Also remove all other files except prefs.js and cert8.db (contains mitmproxy certificate info) - this will leave your Firefox-based browser with ONLY the proxy settings changed from the default clean install.
Endless. You can even check if an extension is making unnecessary requests. Some of the so-called privacy extensions will in fact intrude on your privacy by making connections behind your back. Replaying requests, replacing parts of the content in a webpage. Hell, you can do actual hacking with it, such as sniffing passwords, or sending fake pages to your victim - but these are much tougher than simply testing a browser's privacy, and a subject for another article. You can also hook up any program that communicates over HTTP, like RSS readers. Have fun!